Hi everyone, today I have four polishes to share with you from Celestial Cosmetics. Two are from the newest collection by Celestial named ‘We Breathe Fire” inspired by Eragon from the Inheritance Cycle by Christopher Paolini. The other two are very special limited editions. Read on to find out more!
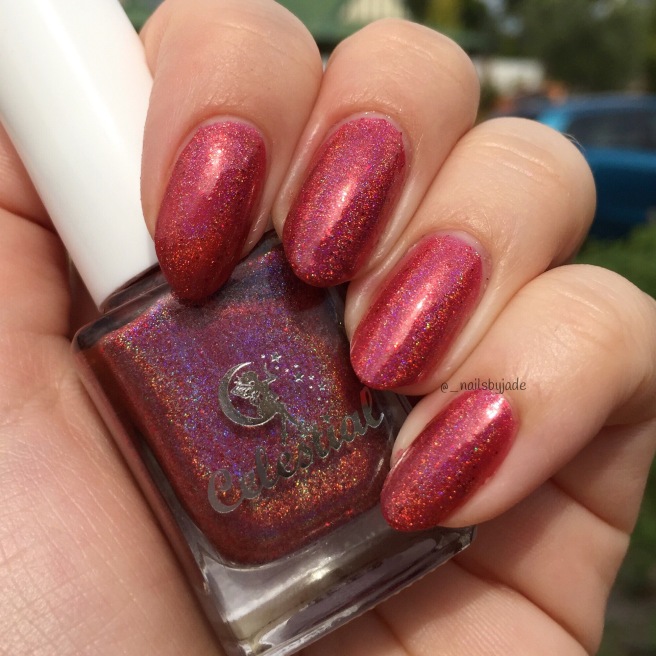
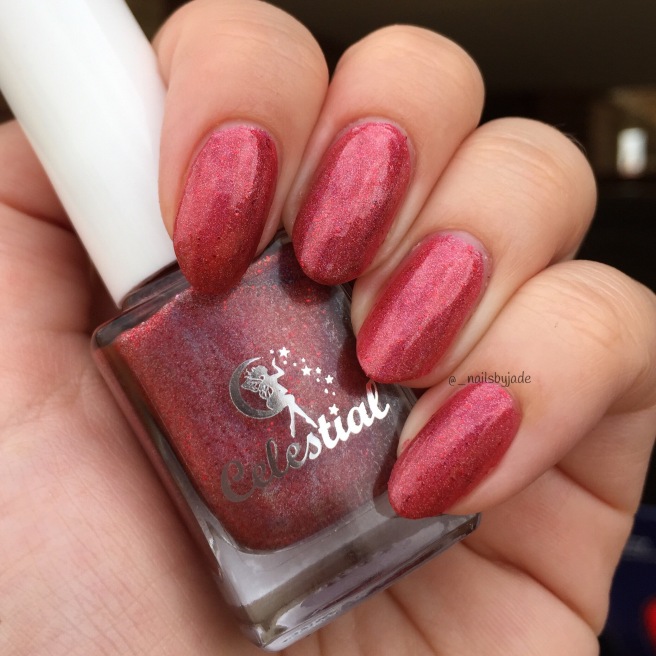
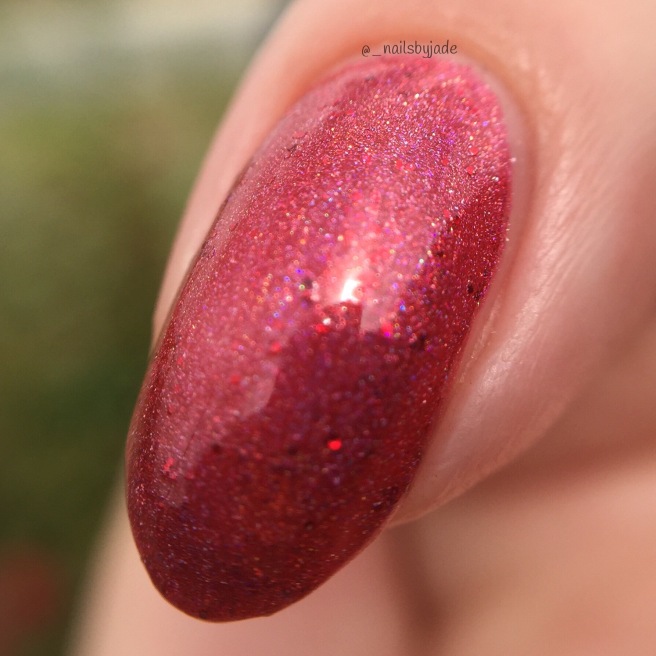
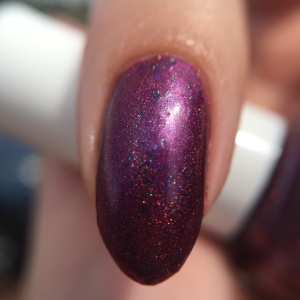
The first polish I want to share with you is the July LE. This year the monthly limited edition polishes are based on flowers as voted by the members of the Celestial Stars Facebook group (you can click on the link below to join). This month the flower voted for was the Waterlily. This polish is a beautiful lilac purple filled with micro holographic glitter, violet sparks and golden flakies.
I really love this polish as it is so pretty, pastel and sparkly- everything I love in a polish! The application was super easy, almost a one coater but I did use two coats as some parts were slightly patchy. It does dry slightly textured but a good topcoat will make it all smooth and super shiny for you! Definitely a favourite from the polishes I was luckily enough to review and also in my top ten favourite Celestial Cosmetics polishes from my extensive collection. It is limited edition and will only be available until stock runs out, so get in quick!
The next two polishes are from the We Breathe Fire collection inspired by Eragon from the Inheritance Cycle by Christopher Paolini. Thorn is a black based linear holo with rose gold coloured flakes and red sparks. I really like this polish and it looks just stunning in the sun! I found the flakies to be quite subtle and they did hide in the photos, but they are in there! I believe that black holos are a staple in every polish lover’s collection and I know this colour will be very popular. A very easy application- two coats with a topcoat!
Jarnunvosk is a soft nude colored holo filled with gold flakes and a gold shimmer. I found it quite similar to another Celestial polish named Going to the Beach from the Tropical Holiday collection, but it no less beautiful! It is more of a soft nude base where as Going to the Beach as a milky white base, but the flakies are similar. It is a lovely neutral colour and I like these colours to wear to work as they are classy and this type of colour goes with literally anything you might wear! Another easy application with two coats and a topcoat.
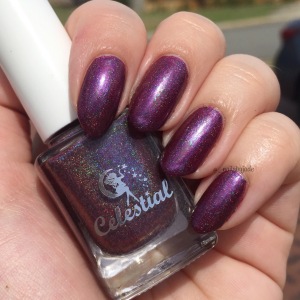
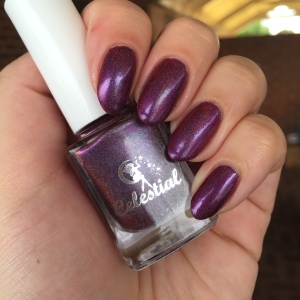
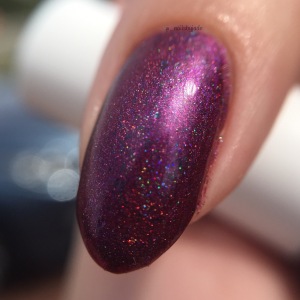
The last polish is a limited edition polish created by Nicki in memory of her late parents. ‘First, Last and Always’ is a dark purple based jelly polish with colour shifting flakies. They were quite difficult to see in the sun but in the shade you can really see all the different colours the flakies pop! I really adore this polish and couldn’t stop staring at my nails whilst wearing it! I have become obsessed with flakies lately, they just look amazing! This one is also limited edition and once it sells out it won’t be coming back, so pick it up while you can.
All of these polishes have an excellent formula and were very easy to apply. There is a variety of colours which is one of the things I love about Celestial! We also have holos, glitters and flakies in this release which is super exciting! They are all super pretty and I really like them all. My pick for this release is the August LE as lilac is one of my favourite colours!
These polishes are available from July 31st on the Celestial Cosmetics website! Check out the links below for all the purchasing links and social media sites (these are not affiliate links). There are also four other polishes in the ‘We Breathe Fire’ collection available for purchase, so check out the Celestial Cosmetics Instagram if you want to see swatches of them. Which one is your favourite?
Thanks for reading, and I will be back with you soon with more polish reviews for you all! I am still struggling with formatting and general presentation in my blogging, it is something I really need to sit down and teach myself. At the moment I just do not have the time, being assigned my first teaching post as a graduate teacher 5 hours away from my home town, I have a lot to learn and do! I promise, once I get the hang of my profession, I will start to improve on my hobby (nails and blogging)!
Disclaimer: I was kindly sent these products for free by the abovementioned company in exchange for an honest review. All opinions stated are my own and have in no way been influenced or paid for
Hi everyone, today I have two gorgeous polishes to share with you from one of my favourite indie brands, Celestial Cosmetics! These polishes come from the Pun-Tastic Collection which is due to be released on 26th June AEST in the Australian store and on the 25th June PDT in the International store! These are 2 of 6 polishes from this funky collection and I know you will love them!
‘This is Panda-monium’ is a bright pink leaning red linear holo with a dash of irridecent flakes. I absoloutley love this baby, its unlike anything I own! I really like the fact that there are only a small amount of flakies so it doesn’t take over the holo. It all seems to work together seamlessly to create a beautiful, one-of-a-kind polish! It was a tad difficult to photograph and the colour appeared more dull in the photos, but it is super bright in real life! In the sun the holo shines, yet in the shade you can see the gorgeous flakies. Great formula, super easy to apply, not to thin or thick- just perfect! I used two coats topped with a topcoat that probably was not necessary to do but I used one anyway to make everything pop!
SunlightShadeShadeMacroMacro
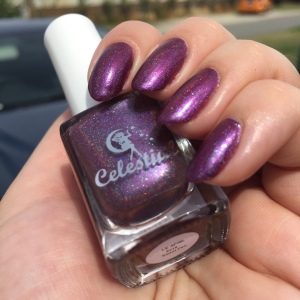
‘Toucan Play That Game’ is a deep, dark yet bright purple linear holo with purple and green colour shifting flakes! Another stunning purple to add to my other gorgeous Celestial purples. This one looked beautiful in the sun- the holo seems to glow and be seen for miles! In the shade you can see the super pretty colour changing flakies, though they were more shy than in ‘This is Panda-monium’. Again, super easy to apply and great formula! This was two coats on its own. I did have a slight issue with cuticle staining, but this is normal with super dark colours. I remember this day I had broken two nails so I was trying to swatch quickly before the completely fell of their hinges so that probably did contribute. Just be super careful and patient and you will be fine!
SunlightSunlightShadeMacroMacro
These babies are releasing tomorrow with 15% off for the first 48 hours- use the code ‘hello15’ at the checkout! They will retail at $12AUD and $11USD each. I am definitely going to pick up the other four polishes! They are all super fun and gorgeous. I absoloutely adore the names of the polishes- Nicki is super creative and hilarious!
See below for where to purchase and be sure to check out all the Celestial Cosmetics social media links to see more beautiful swatches of the Pun-Tastic Collection and others from there store! The beautiful Rose inspired June LE is also available for another few days so be sure to grab it during the sale before it is gone forever! You all know how much I love my Celestial’s- they never disappoint and it is my mission in life to own them ALL!
Another fanatstic collection created by Celestial Cosmetics- I wonder what they will come up with next?!
Disclaimer: I was kindly sent these products for free by the abovementioned company in exchange for an honest review. All opinions stated are my own and have in no way been influenced or paid for
Good morning everyone, and I’m sorry or the delay in this post- I have been super busy this past month with a new job and a new house, I haven’t had time to think, let alone blog! Today I will be showing you the gorgeous June LE by Celestial Cosmetics!
This year the monthly LE polishes are inspired by flowers- this month is the Rose. That being said, when I think Rose I definitely don’t think blue- I didn’t even know blue roses existed! Nevertheless, I learnt something new and the picture voted by the members of the Celestial Stars group was a blue rose, see below.
The polish is a blue sapphire holo with purple shimmer. I think it matches the inspiration picture perfectly! In different light and angles you can see all of the different colours in the polish. It is such a pain to photograph the purple shimmer, but it is much more obvious in person.
Sunlight (Cloudy day)
The polish itself is so beautiful. The colour absolutely glows. Rain or shine, it’s no less gorgeous! I think it may be one of my new favourite blues.
The application was super easy- the polish itself is quite thin but it wasn’t difficult to apply. It self levels and is opaque in 2 coats. I did not experience any staining with this polish but with blues it’s better to be safe than sorry, so a good base coat would help prevent this.
Shade
I really adore this polish- you’ve got a little over a week until it is gone forever though as it is limited edition, so it will only be available in June. If you are a blue lover, you definitely need this!
Again, my apologies for delay in getting this blog out to you- I hope to be back on my regular scheduling soon.
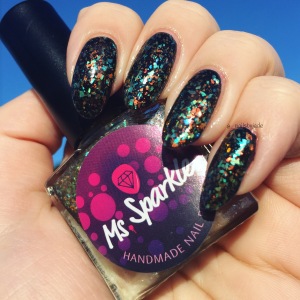
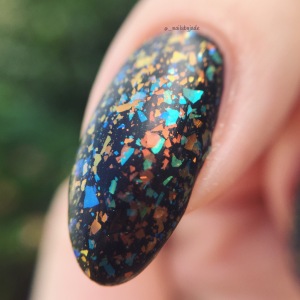
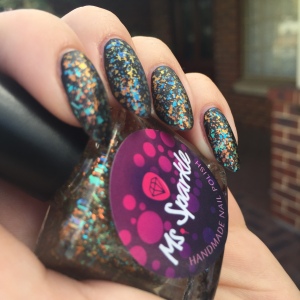
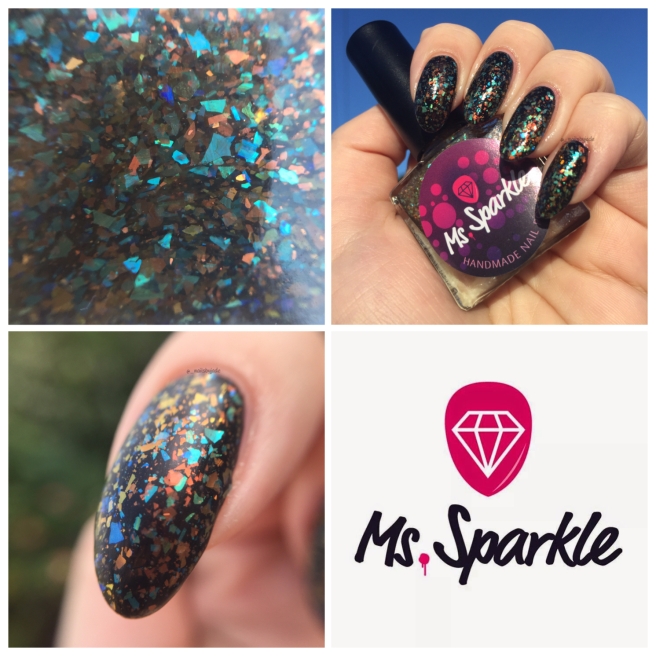
Today I have an amazing polish to share with you from a new brand that I have only recently tried- Ms Sparkle Polish! I ordered three colours awhile ago and I want to talk to you about one of them today. Be warned: Flakie Spam Alert!
I also want to wish Ms Sparkle Polish a very happy second birthday for this Saturday! I’m a bit sad I didn’t discover the brand sooner as they have some beautiful polishes! They have a 30% sale going on at the moment to celebrate so if you are thinking about purchasing now is a good time to do it!
Macro bottle shot
It took a few goes to get my polish to me as they kept breaking in transit (The Netherlands is a long way from Australia!) but I now have 2/3 of my new babies (the third is on the way). Simone (creator of Ms Sparkle Polish) has been nothing but understanding on this and I really appreciate her sending the polishes again (multiple times)!
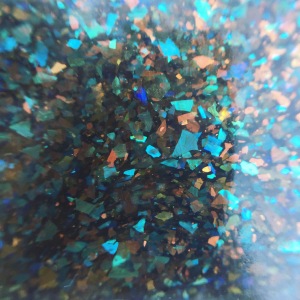
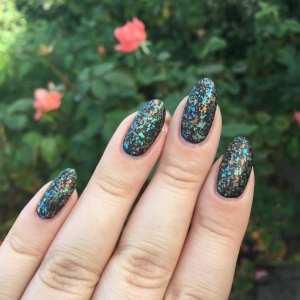
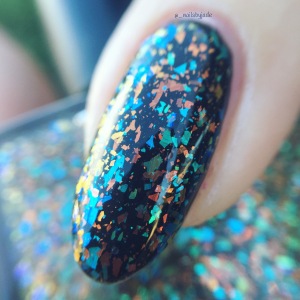
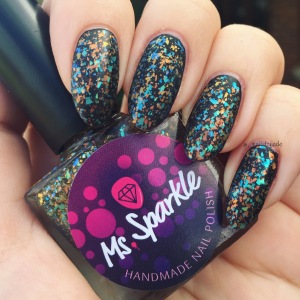
The polish I want to share with you is particularly special. It is named ‘Orange Bay’ and it is a flakie topper with green, blue and orange flakies! This is the first flakie polish I have tried and my goodness I am OBSESSED! For my swatches I have layered two coats over black with a topcoat. The polish is so smooth and easy to apply and there were no flakie bits sticking out! It was heavenly!
Sunlight shot
The colours and flakies shine in all different angles. I chose a black base so it would really stand out but I can imagine it would look amazing over other colours as well! I could not stop looking at my nails and left this mani on for a few days (which is a long time for me). There was so much depth with two coats. You could do one coat if you wanted as there was heaps of flakies with one but I wanted maximum flakieness!
Macro
I used both a normal topcoat (Glisten and Glow HK Girl) and also a matte one (Sally Hansen Big Matte Topcoat) to get two different looks. I can’t decide which one I like more!
Mattified
Macro bottle shot
I love this polish, I can’t rave about it enough! I ordered the four new flakies from the new ‘Flakies All Over The Place Collection’ and I’m sure I will adore those as well, they look beautiful!
Be sure to check out the Ms Sparkle Polish Website and social media pages for more info and gorgeous swatches! I will link them below. I hope you love this one as much as I do- please let me know! The best thing about this brand is they are very well priced AND they ship internationally- how can you not love them? Happy 2nd Birthday Ms Sparkle Polish! Remember use the code ‘mssparkle30off‘ in Simone’s shop for a 30% discount until May the 15th!
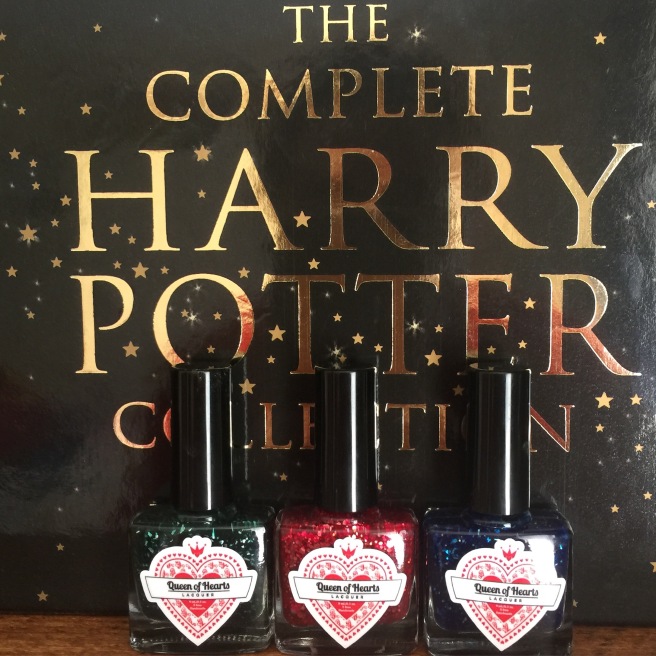
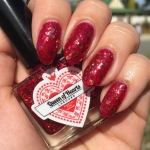
Today I have a new Aussie Indie brand to share with you all- Queen of Hearts Lacquer! It is a bit of a long post and is quite picture heavy, because I am trying out a new way to include more images on my blog posts. Please read to the end and let me know your opinion 🙂 You can also check out my Instagam here for a closer look at the shots I took.
Queen of Hearts Lacquer launched on March 1st with their Wizarding World Collection. Their collections are “inspired by great myths, books, movies, TV shows, and everything in between”.
All Queen of Hearts Lacquer polishes are 5 free (which means free of the following harmful chemicals- Toluene, Formaldehyde, TSF resin, Camphor and DBP). They also do not test on animals, and are against animal cruelty of any kind.
As they are a new brand starting out, their Instagram is not active just yet, but feel free to check out their Facebook page for updates as Maddison (the owner) is active over there.
I was extremely excited to be approached my Maddison to try out two of her polishes from the Wizarding World Collection! I couldn’t choose just two, as I really liked them all, so I asked her if I could purchase a third one and she could send it along with the other two for me to try. I am now considering buying the rest of the collection as I was very impressed with the results!
Macro bottle shots
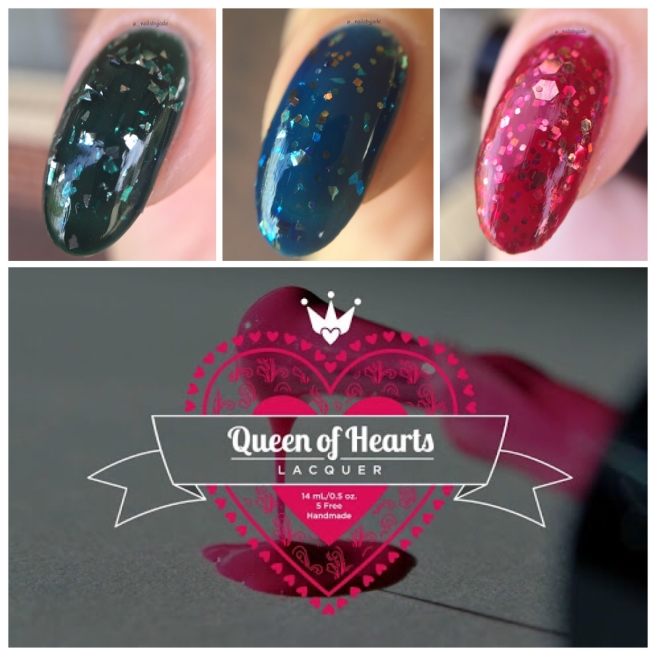
There are eight polishes in the Wizarding World Collection- one glitter topper, one crelly, three shimmers and three jellies. A large variety of polishes which when combined together make a stunning new brand launch collection!
Now, don’t get me started on Harry Potter. I am obsessed. Ever since I was a kid I have loved anything to do with Harry Potter. It has seriously been a problem for me. My dream in life is to go to London and visit Harry Potter World! I cannot even explain how much I love the book series and the movies. It something I can never get tired reading and watching. I had actually started re-reading the books again when Maddison emailed me, so I thought that was great timing!
Now, enough of my rambling, (finally) onto the polishes!
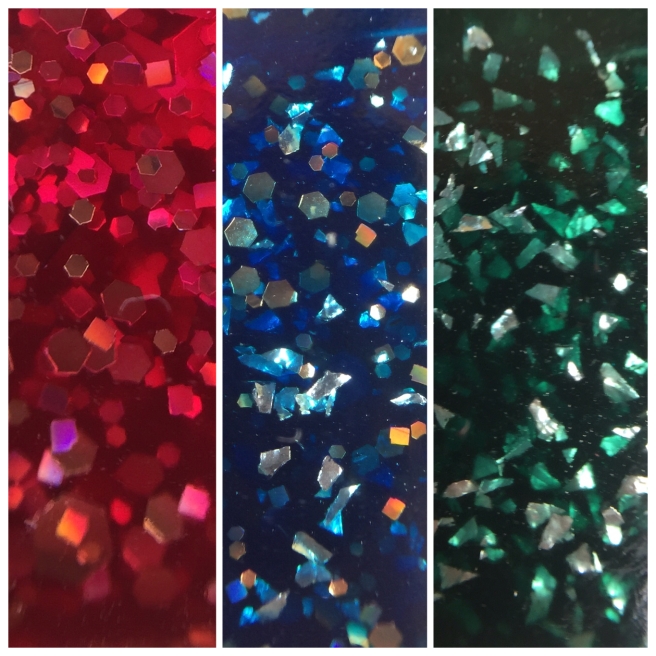
I was intrigued to try the three jellies of the collection. I thought they looked very unique and I do not have many jellies in my collection. Alas, I chose to try The Cunning, The Inquisitive and The Daring.
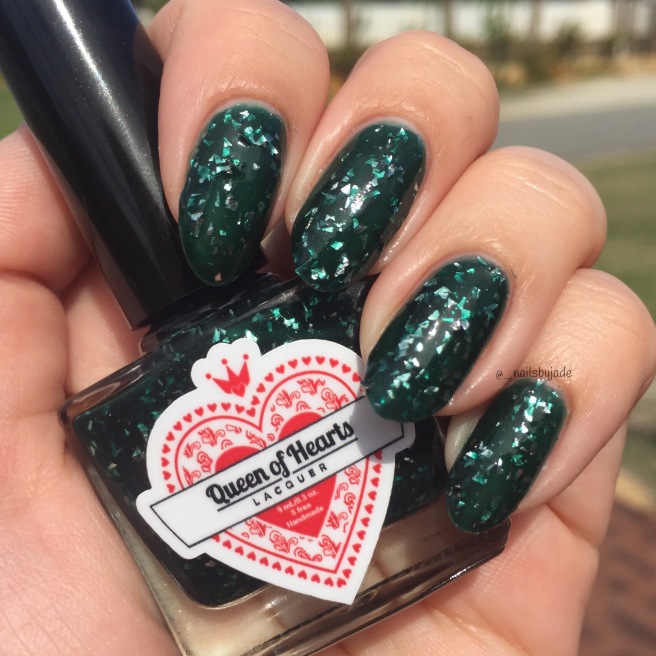
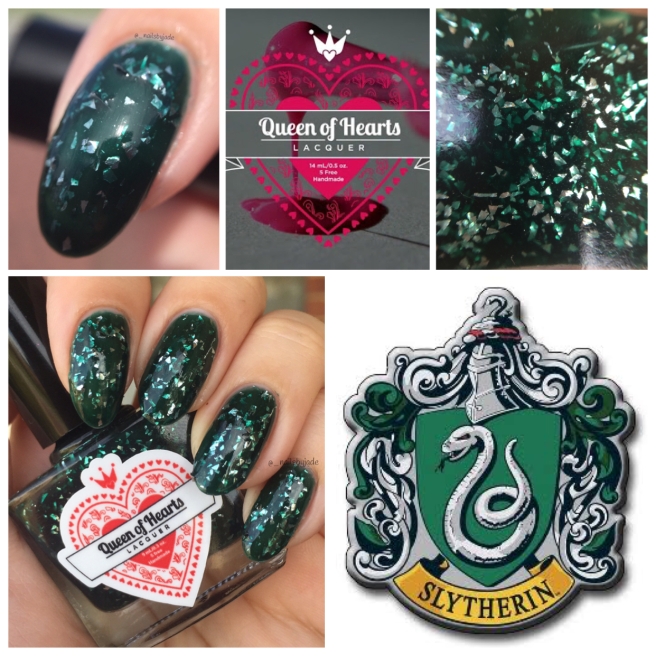
The Cunning is a dark green vampy jelly polish with specks of edgy silver glitter. Inspired by the House of Syltherin, whose students are considered to be very cunning and ambitious, the Syltherin house is also associated with the colours of green and silver, which are the main elements in this polish.
Inspiration
Sunlight shot
Macro sunlight
Shade shot
Macro shade
Bottle macro
I quite liked this polish, it is not a green I would normally choose, but I was impressed with the silver glitter in it, and I think it is very clever how it has been put together. The jelly formula was easy to apply, and a decent amount of the silver glitter was covered in the swatch. I used three coats, but you could get away with two if you wanted. Some of the silver glitters did stick out, but nothing that a thick coat of topcoat couldn’t fix!
Sunlight shot
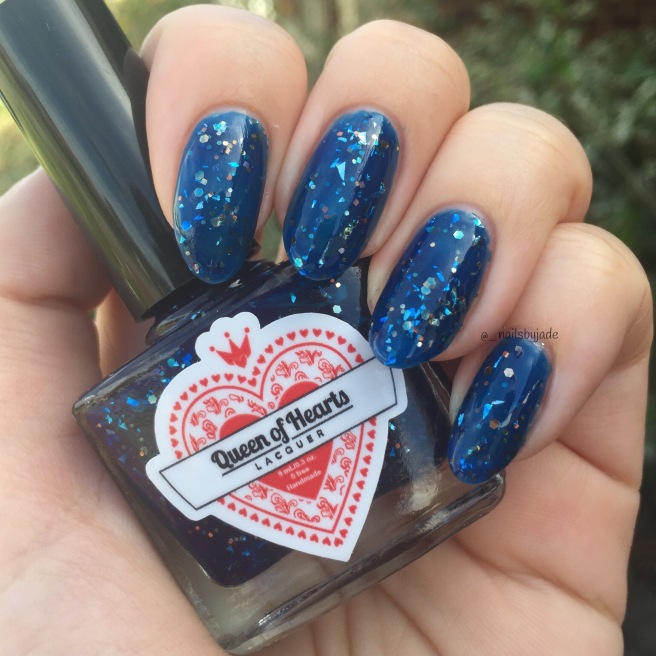
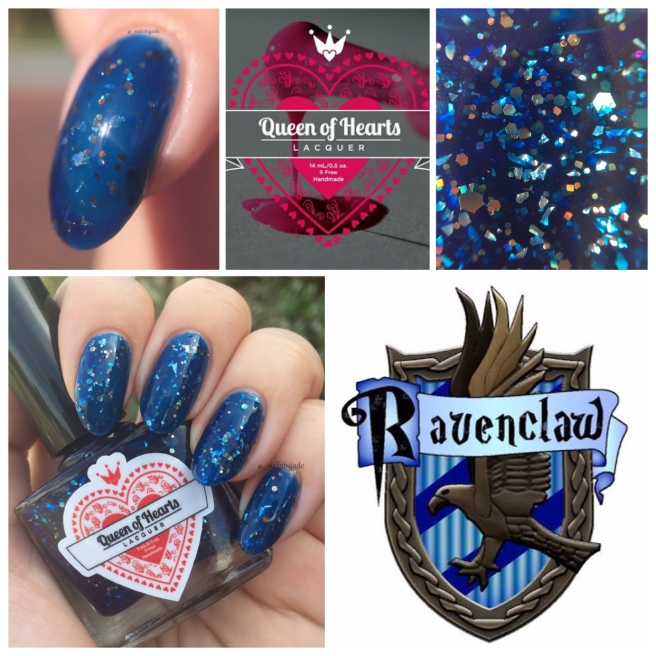
The Inquisitive is blue jelly polish with different shaped copper and silver glitter.
I believe it is inspired by the Ravenclaw students who are always keen to learn and are very wise. The colours of blue and bronze are associated with the Ravenclaw house symbol of which both a used in the creation of this polish!
Inspiration
Shade shot
Macro sunlight
Sunlight shot
Macro shade
Bottle macro
I liked this polish as I am a huge blue fanatic, but I did find it to be sheerer than the other two with the glitter density a lot less. There is no problem with that, however I like my jellies to be filled with tonnes of glitter! It’s all up to personal preference. I used three coats with a top coat to smooth out some of the silver shards that stuck out slightly.
Shade shot
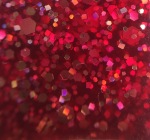
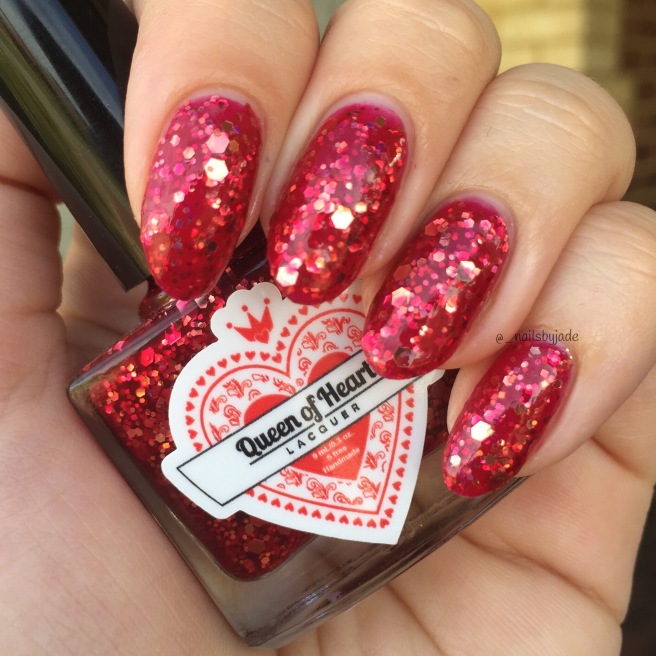
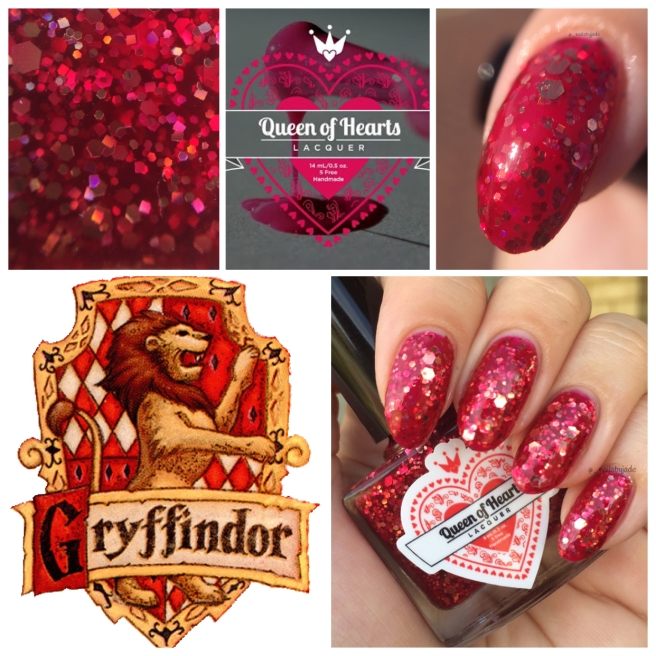
The Daring is red near maroon jelly polish packed full of copper, gold and metallic hexagon glitters of all sizes! The Gryffindor House considers its students to be very courageous as well as be daring, have nerve and be very chivalrous. The colours of Gryffindor are red and gold, which are both strong elements of this polish.
Inspiration
Shade shot
Macro shade
Sunlight shot
Macro sunlight
Bottle macro
I really love this polish, the red is a gorgeous colour and there is so much glitter. It is so squishy and the jelly formula is very good. I did not find it difficult to get the glitters out, they are really packed into the bottle and came out smoothly. There were not as many of the larger glitters compared to the smaller ones, but as evident in my swatches they are still heavily present! I used three coats but you could get away with two, I just like it looking very squishy and it shows the depth with more coats. I did not have any issue with the glitter shards sticking out massively, so only one coat of top coat was needed to smooth it out and give it a glass-like finish.
Shade shot
I am very impressed with the polishes I tried from the collection! I think that Queen of Hearts Lacquer has done an amazing job with the polishes for their first ever collection! As previously mentioned, the Harry Potter fanatic in me makes me want to go and get the rest of the polishes! I think they all look great! The formulas were very good and easy to work with. I loved that there was so much glitter in them as well. What I liked most is I could really see that Maddison has researched all of the polishes and what the inspiration is behind each of them! Maddison, you have done a great job and I want to congratulate you on a successful opening collection for your new brand and I cannot wait to see what the future has in store for you!
The links to all the Queen of Hearts Lacquer social media’s will be linked below. Please see the website here to purchase these gorgeous polishes and to see the others in the collection!
What do you think of this style blog post compared to my others for nail polish reviews? Do you think there are too many photos? Are the individual photos under each description too small? I want to include more images of the polishes but I do not know if it is too much, especially the collages at the end. Please let me know in the comments or you can comment on my Instagram posts as well.
Disclaimer: I was kindly sent 2/3 of these products for free by the abovementioned company in exchange for an honest review. All opinions stated are my own and have in no way been influenced or paid for.
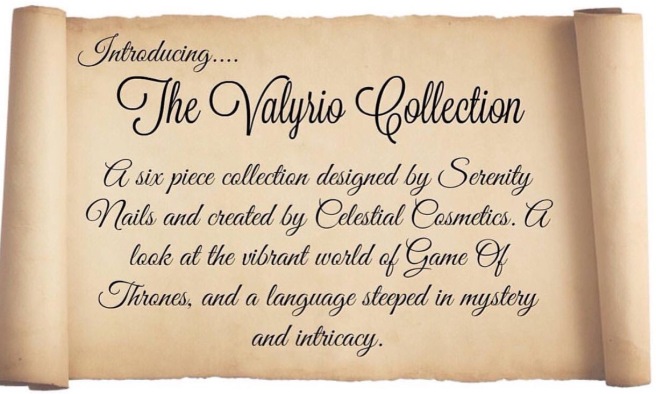
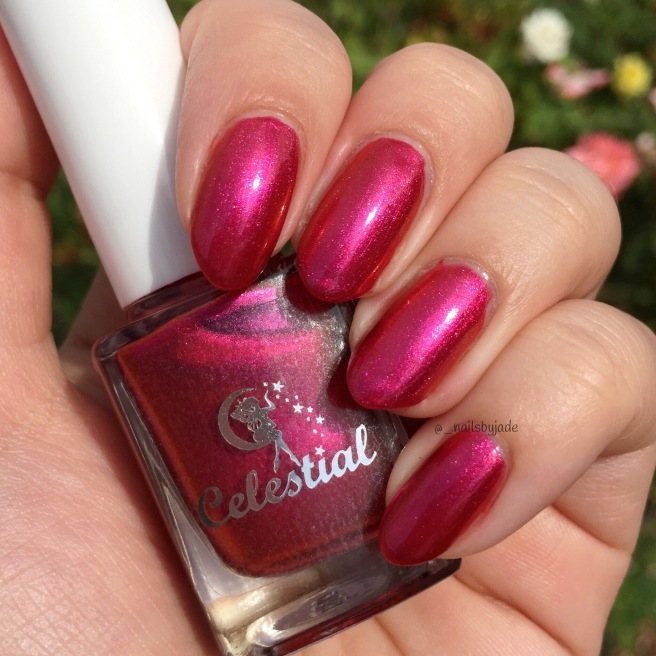
Hi everyone, today I have a very special new polish release to share with you all. April 25th is the third birthday of the Celestial Cosmetics nail polish brand- yay! Happy Birthday Celestial! As you all know, even before coming a blogger for Celestial Cosmetics, I absolutely loved their polishes. I can definitely say they are my favourite indie polish brand and they were one of my first indie polish purchases. Ever since discovering them, I have been hooked into the world of indie polish and I have purchased polishes from Nicki (the creator of Celestial Cosmetics) nearly every month since. I am obsessed with their holos and the monthly LE polishes. I cannot pass them up and may I say I have never, ever had an issue with any of their polishes! They have grown so much as a brand in three years and I can only see them rising further from here. So, again I would like to wish the Celestial Cosmetics brand and team a very happy third birthday, and I cannot wait to see what the future has in store!
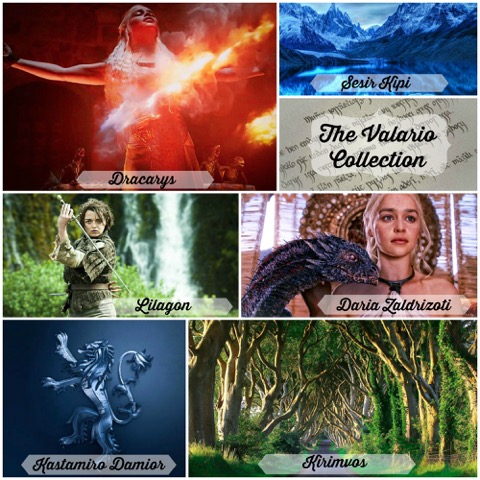
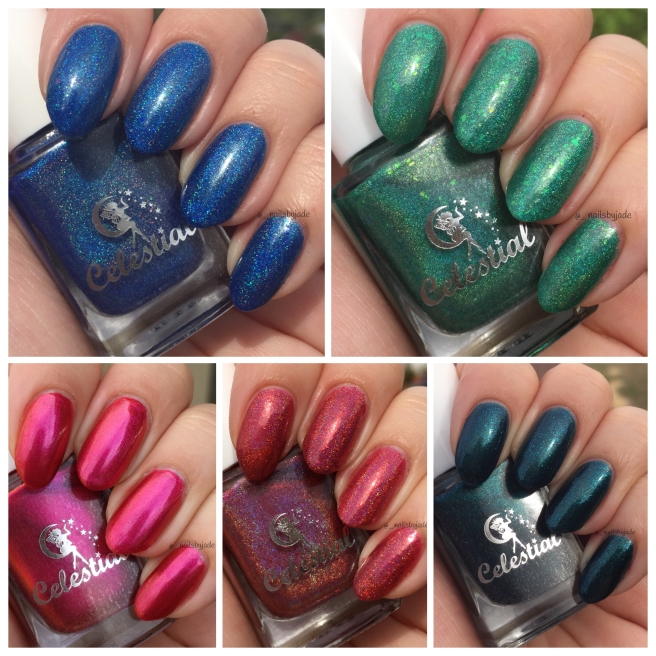
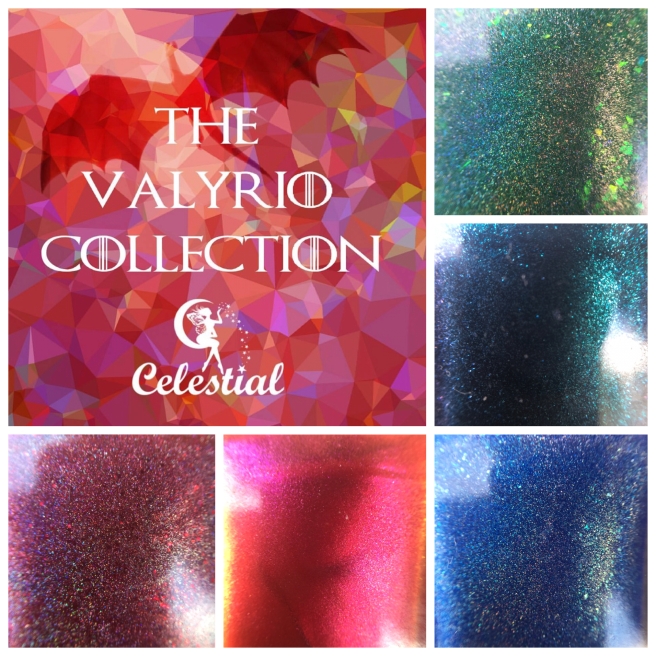
This special third birthday collection was created in conjunction with Christine of Serenity Nails, an amazing Australian nail blogger and a good friend of Nicki’s. Together, they created six beautiful polishes for The Valyrio Collection, inspired by the Game of Thrones! The Valyrio Collection name is a twist on the language of the High Valyrian, spoken in Game of Thrones. I have five of the polishes to share with you today.
Inspiration images for the polishes
The first colour is ‘Dracarys; which translates literally into ‘dragon-fire’. It is a burnt red linear holo with golden shimmer and red micro glitter! Another stunning colour which I think is perfect for Autumn that is coming up in Australia as it reminds me of a fireplace! Two coats and no topcoat for my swatch.
Sunlight shotShade shotMacro
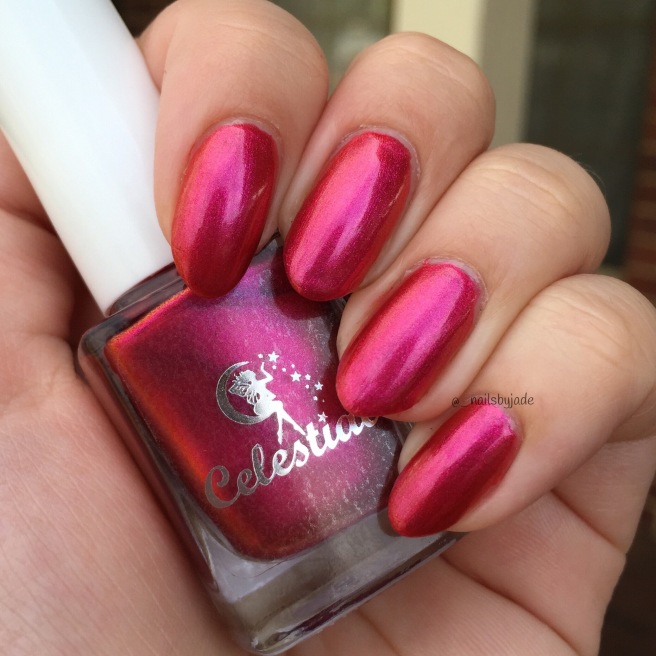
The next polish is name ‘Daria Zaldrizoti’ which translates to ‘The Dragon Queen’. It is a bright red-pink-orange duo chrome with a strong flash! It is a very interesting colour, super bright it almost blinded my eyes and my camera freaked out photographing it. It is stunning in all different lights and the duo chrome is so strong it looks like you are wearing three different colours on your nails! My swatch shows two coats and no topcoat.
Sunlight shotShade shotMacro
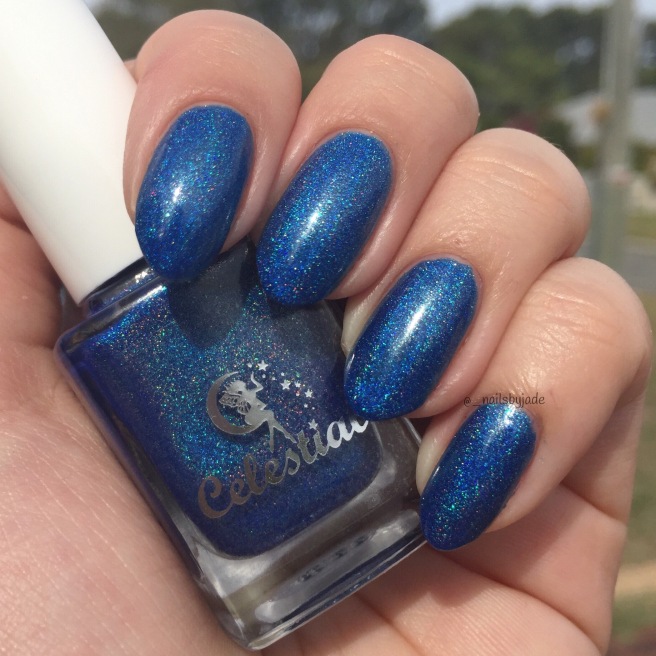
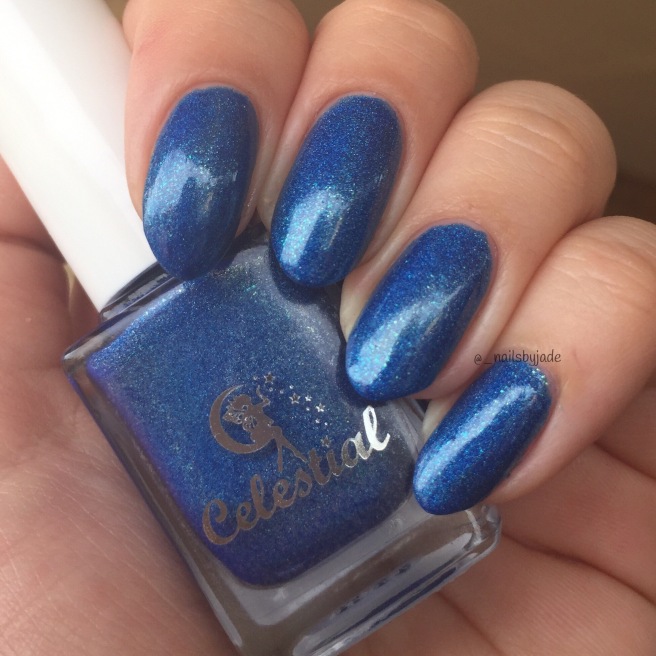
The third polish ‘Sesir Kipi’ which translates to ‘And now, we ride‘ is a gorgeous sapphire blue holo! Such a stunning blue with copious amounts of holo, this is a blue that everyone should have in their collection! Two coats and no topcoat.
Sunlight shotShade shotMacro
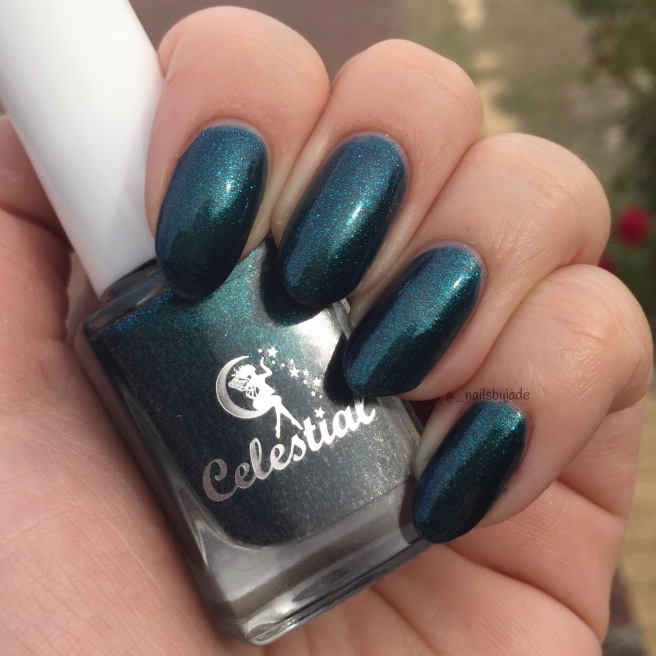
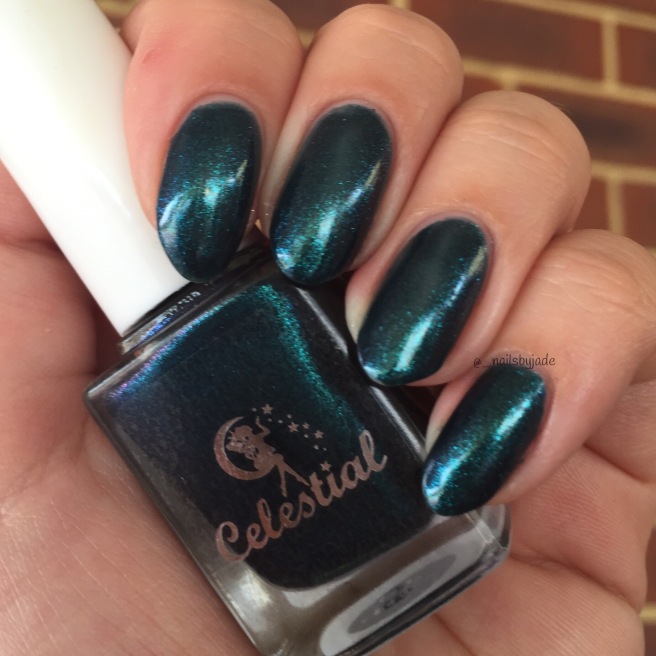
‘Kastamiro Damior’ which translates into ‘Rains of Castamere’ is a simply stunning deep, almost blackened teal colour which has a strong green-blue-purple duochrome with lots of pretty shimmer! A very complex colour and is so gorgeous! This is two coats and no topcoat.
Sunlight shotShade shotMacro
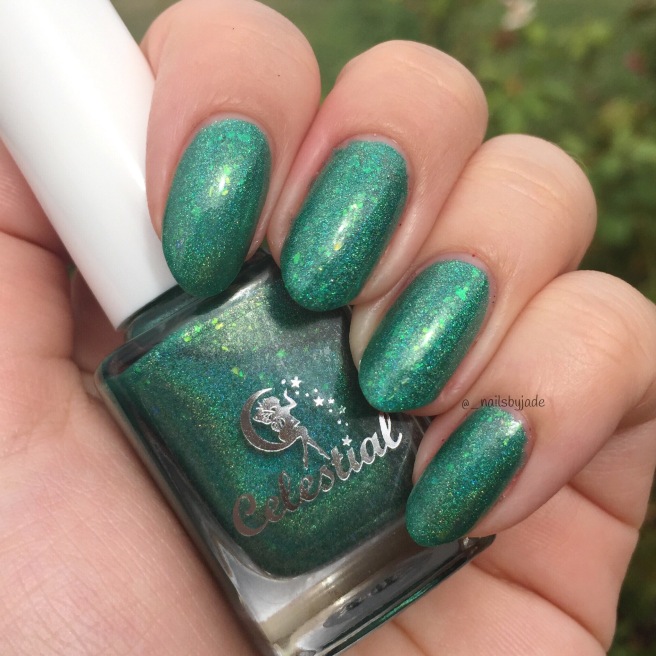
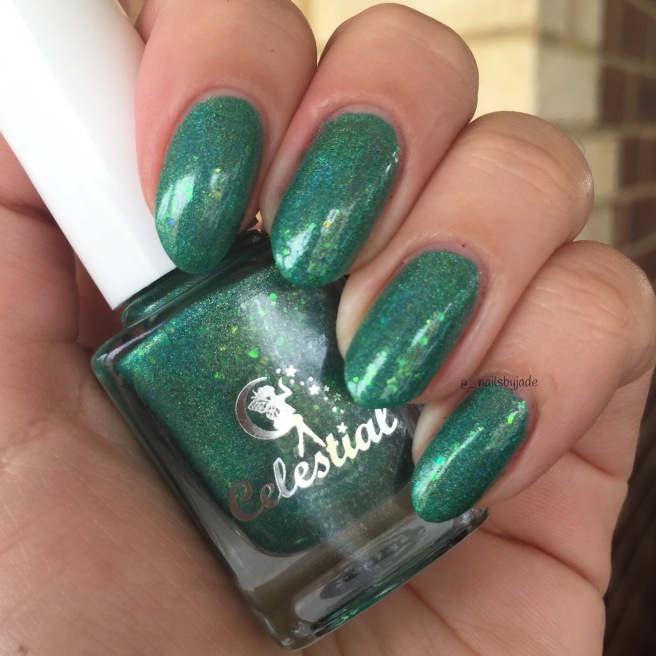
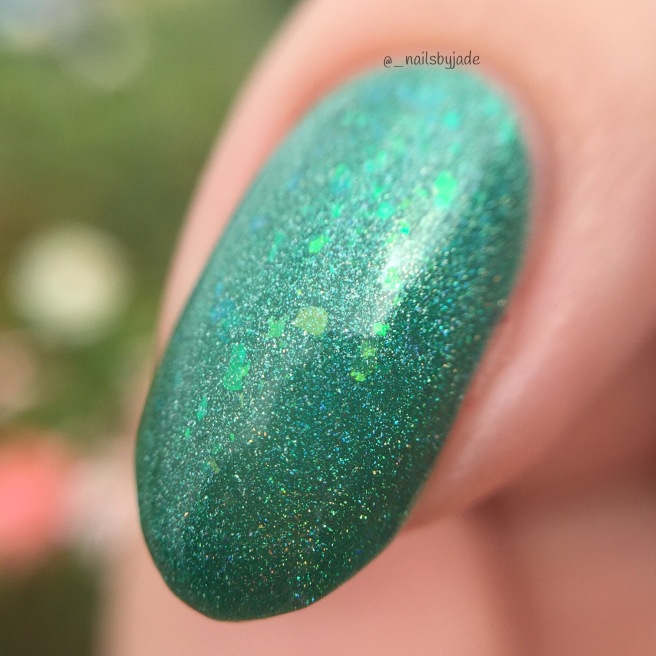
The last polish I will be sharing with you is named ‘Kirimvos’ which means ‘thank-you’. It is an emerald green holo with opal flakies! It is a truly beautiful colour and I just love it! Two coats and no topcoat.
Sunlight shotShade shotMacro
Overall, I really , really, liked this collection. I do not religiously watch Game of Thrones, but I may have to get back into it after the excitement of this collection! I guess I expected dark, brooding colours- boy was I wrong! There are a variety of colours which are all so vibrant and which I believe really reflect the different aspects of the show, and as always the formulas are superb and did not need a topcoat to finish them off (this was my choice, but you could choose to topcoat if you wanted to for longevity of wear). My favourites for the collection are hard to choose as I really love them all, but as I am a sucker for blue holos I think I will have to go with ‘Sesir Kipi’ and because ‘Kirimvos’ is just so gorgeous I think I will have to pick that one too!
This collection will release on April 15th in the Australian store, and hopefully on April 22nd for the international store, if the polishes arrive there safely!
Game of Thrones collections are very popular and highly sought after, so you do not want to miss this one! Congratulations to Serenity Nails and Celestial Cosmetics on producing another wonderful collection! All the polishes are all amazing and definitely worthy of this special third birthday release.
Please see below for all the Celestial Cosmetics social media pages for more swatches and the websites where you can purchase these polishes.
Happy 3rd Birthday to Celestial Cosmetics and I wish you many more years of success. Nicki, you have done a great job not only on your polishes but your brand as a whole. My Celestial’s are my favourite polishes and I know I will continue to love them. It has been an honour to work with you this year and I can’t wait to see what you come up with next!
Disclaimer: I was kindly sent these products for free by the abovementioned company in exchange for an honest review. All opinions stated are my own and have in no way been influenced or paid for.
Hello to all, and welcome back. I hope you all had a lovely Easter long weekend filled with good company and lots of chocolate!
Today I have a new polish from Celestial Cosmetics to share with you. It is the monthy limited edition release polish for April named the ‘April LE 2016’. The monthly limited edition releases this year are based on the birth flowers of each month. April’s birth flower is called the Sweet Pea. Nicki (the brilliant mind and creator behind Celestial Cosmetics) posts inspiration images onto their Facebook page and members can vote on which photo they like best. Whichever photo wins the vote is used as the inspiration for the polish. Here is the photo that was chosen this month.
This polish is extremely complex. It has a reddish/purple duochrome base with lots of holo, green shimmer and blue flecks! I am honestly unsure of how Nicki has managed to put all of these things together to produce such an interesting polish! There are a lot of elements, but it is not overpowering at all, and is very wearable all year round. Even in the shade, the colour is still so lovely and the blue flecks really stand out! I think it is a great polish for all year round, rain or shine, as the holo/duochrome will knock you out in the sun and the reddish/purple base is a perfect fit for cooler months.
Sunlight shot
Sunlight shotIn the shade shot
The formula is superb, as I have found with all the Celestial’s I own (and believe me, there are a lot)! It glides on smoothy and self-levels. I used two coats for my swatch, and no topcoat. I find with most Celestial holos I do not need a topcoat as they are spectacular in their own right, but if you want to add a topcoat for longevity of wear then by all means, go for it! I had a small issue with staining of the cuticle and finding it difficult to get the excess polish out of my skin, but if you are very precise with your application this will not be a problem. The flakies are small and I did not have any issue with them sticking out that they would need a topcoat. You can really see the blue flecks in the macro’s below!
Macro shot
The April LE will be available from today (April 1st) on the Celestial Cosmetic website here for Australian customers. For those purchasing from overseas, the international website here will be releasing this polish once the stock has arrived at the US warehouse, hopefully very soon! If you would like to see more swatches or find out more information about this release or other Celestial Cosmetic’s polishes, feel free to head on over to their social media pages which I will link below.
I really like this polish because it is a one of a kind in my collection, because it has so many elements that combine effortlessly to produce such a unique polish! I feel I will be wearing this one alot as it is coming up to Winter in Australia, and this will go well with my all black wardrobe! I love my bright colours in the Summer but when Winter flicks over I seem to have a split personality and I am all about the purples, greens and deep blues!
Disclaimer: I was kindly sent these products for free by the abovementioned company in exchange for an honest review. All opinions stated are my own and have in no way been influenced or paid for.
Hi everyone. This is the last part of my three part eyebrow story. If you did not read Part 1 and Part 2, you can click there if you want to read them. If you don’t, basically all you need to know is that I have very small, fine, shapeless eyebrows! After making the decision to get my eyebrows tattooed (to the horror of my parents) I went to see Michelle Osborn of Feather Touch Brows (in Perth). I researched a few different places before decided on Michelle’s studio. She has a Diploma is Cosmetic Tattooing and performs permanent makeup services in addition to eyebrow tattooing. I stalked her Instagram for weeks before deciding to take the plunge and book a consultation. I wanted to ask a few questions before I committed to getting the feather touch tattooing done.
Thank God you found me Michelle!
Quoted directly from Michelle’s website here, “Feather Touch is a method of cosmetic tattooing using a hand tool called a micro-blade rather than a tattoo rotary pen (machine). Hair-like strokes are made into the skin in the direction of your natural brow to mimic real hairs. This method is perfect for creating a whole transformation for a client that has sparse brows, filling in gaps from over plucking or an ideal solution for someone with uneven brows”.
And now they can be!
When I went in for my consult, Michelle was so welcoming and friendly. She took me into her studio and asked me what I wanted to know. Having researched feather touch tattooing vigorously I knew a lot about it already, but I just wanted a few things confirmed:
1) How long does it last and do I need it touched up?
2) Will the tattoo fade to a blue colour like certain other tattoos do?
3) Pain level?
4) Will it look natural?
5) Cost?
After she answered my questions, she drew on my eyebrows with pencil which would be the shape she would be working with for the tattoo. Satisfied (she drew them even better than I normally would), I booked an appointment for a few weeks later to have them tattooed. I felt like this appointment was mainly to keep my parents satisfied that I wasn’t getting life-altering drastic black cartoon eyebrows drawn on my face. They still weren’t convinced, but I had made up my mind!
The difference eyebrows (and contouring) can make!
On the day of the appointment, I showed up and after greeting me, Michelle applied numbing cream to my eyebrows and I had to let that sit for about 15minutes. Whilst I was waiting, I filled out a waiver form which basically had all my contact information and some medical history. Once that was done, we went into the room and we discussed the shape I wanted (if it was the same shape from last time). I told her yes and showed her some photos of how I normally do my eyebrows. She wiped off the numbing cream (as my eyebrows were numb at this point) and drew the shape on with pencil. After I confirmed the shape was fine, we discussed the pigment colour I wanted (I got a medium brown) and I lay down on the bed and she got to work tattooing.
She used tool called a micro blade which was like a small metal rod with a blade on the end. Michelle explained that she dips the micro blade in the pigment and creates tiny hair like strokes covering the whole eyebrow. She goes in different directions to add dimension and make it look more natural. We chatted the whole time and I barely noticed what she was doing! Throughout the procedure she also plucked stray hairs that didn’t fit the shape (I also hadn’t gotten rid of the regrowth underneath as I was overdue for a wax- she assured me that was fine though and she didn’t mind plucking them out). After she finished I got up and checked my reflection in the mirror. I was pleasantly surprised- they weren’t huge like I was expecting them to be or terribly dark (having read many reviews with people saying that this had happened to them). Maybe I was used to it as they were a very similar colour and shape to how I normally do my brows when I filled them in with pencil. What I was happiest about was that they were so symmetrical- I could NEVER do my eyebrows like that! I found them a bit thinner than I was used to but she assured me that we could make them thicker in the follow up appointment in 4-6 weeks’ time. A follow up appointment is always scheduled to check on how the brows have healed, and to add more dimension and colour if necessary to the brows. Michelle explained that there are only so many strokes that they can apply in one session to avoid all the lines blurring together which will make it look less natural. After explaining how the healing process works and given instructions on how to care for them until the next appointment, I was on my way.
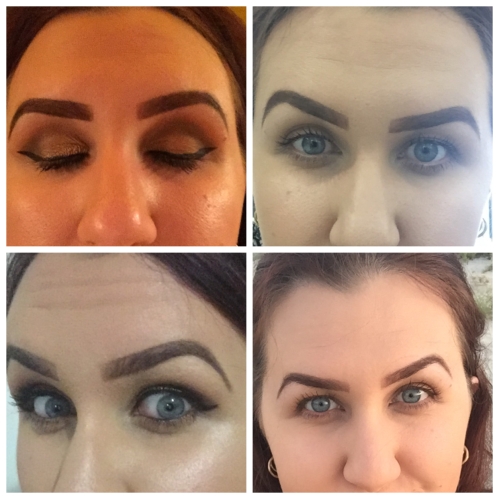
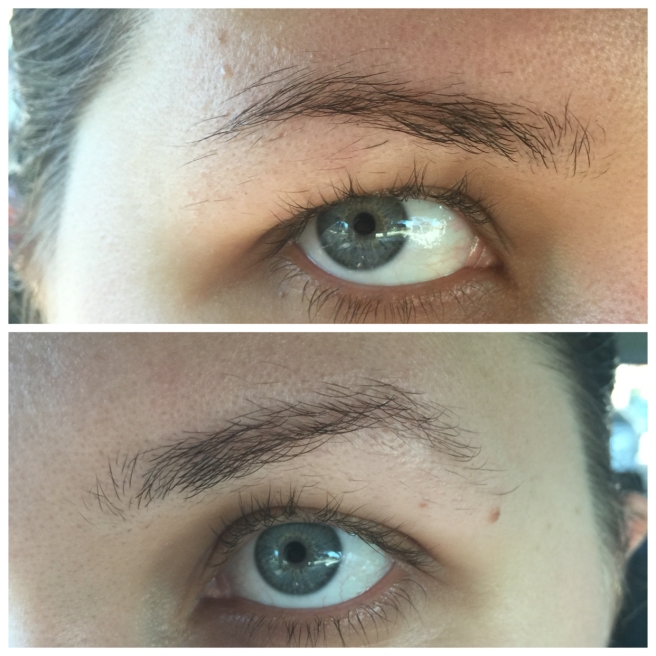
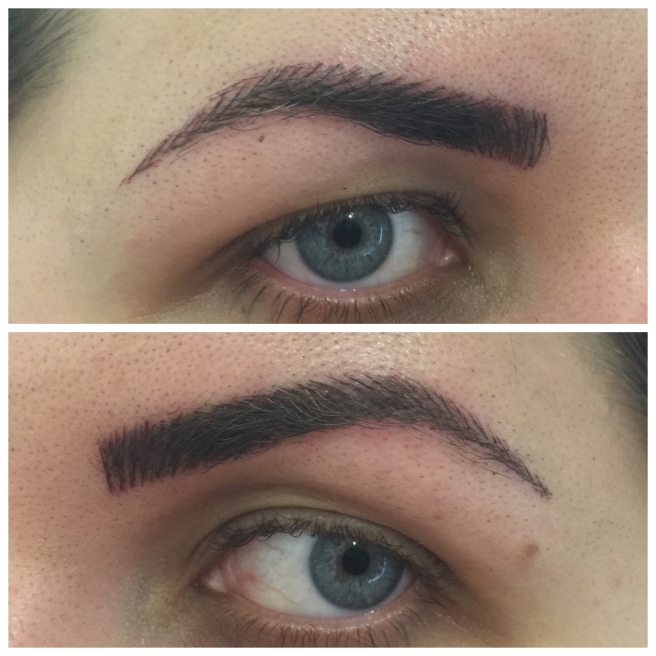
Here are some before and after pictures of my eyebrows:
Before the procedure
Immediately after the procedure
Five days after the procedure
Ten days after the procedure
Here is a little bit of information about the feather touch procedure and healing process:
– Time taken for the procedure: About 1.5 hours from start to finish. The tattooing itself only took around 45minutes (which I barely noticed as we chatted the whole time). The rest of the time was spent on the numbing cream, forms, drawing the shape before the tattoo and explaining the healing process.
– Pain level: A numbing cream was applied, but the area was not totally numb. I could feel the blade going into my skin, but it didn’t feel like a tattoo needle. It felt more like someone scratching my skin. I’m pretty sooky when it comes to pain but I didn’t consider it painful (I would say waxing or threading hurts more than this, though this was obviously for a longer period of time). I would give it a 3/10 on the pain scale, but it will vary from person to person. It might have hurt more if the numbing cream hadn’t been applied, but I cannot be sure.
– Healing Time/Process: Initially the colour will appear very dark, and will fade dramatically within the first week. I would say it was quite dark for the first three days, then it got light very quickly. After a week, it was basically my natural hair colour. After five days, the skin began to peel (or exfoliate) and it looked like flaky bits of skin coming off the area that was tattooed. This was kind of grose, but totally normal and only noticeable to me. The exfoliation lasted for around four days when most of the flaky bits came off and I was left with faded, hair like strokes on my skin where she had tattooed. Apparently, the true colour of the tattoo appears around 7-10 days after the exfoliation has finished. I posted the blog before that happened, but when it does happen I will keep you updated. All I had to do to look after the tattoo was keep it moist with a cream that dries clear used for things like nappy rash (in Australia it’s called Bepanthon) and I applied that 4-5 times a day for the first ten days until the exfoliation finished (I got pretty slack towards the end and was only applying it once or twice a day). This is to ensure that tattoo stays moist and heals properly (same like any tattoo). I couldn’t get it wet (which was difficult- I can’t imagine what I would do if I had my lips tattooed). I applied Vaseline to them in the shower to avert the water, but after a few days my skin was so grose and oily. I was lucky (sort of) to be off that week as I had my wisdom teeth taken out, so I was at home and no one saw me! I didn’t wear any makeup for that week except for the first day as I had to go to work after the procedure- Michelle told me just to avoid makeup around the eyebrow area, which I could do. After a few days I did wash my face fully with a cleanser- I probably shouldn’t have done that but my face was seriously oily. Last of all- do not pick at it when it starts to flake up! It can get itchy and you have to avoid picking the flakey bits off. I did not suffer too much itchiness luckily, but I can imagine it to be very, very annoying if you did! If you follow these instructions it will help retain the colour pigment and speed up the healing process.
It is now day ten post procedure and I am pretty happy with my brows. They are lighter than I hoped, but they colour should deepen a bit now that the exfoliation has finished. If it doesn’t, I can add more pigment at my next appointment. I am pretty happy with the shape, there are only a couple of things I want adjusted, which can be easily fixed (more definition on the tail where I have literally no hair and dimension throughout the eyebrow) in the follow up appointment. If you don’t want to change anything, you do not even really need the follow up appointment (though it is recommended just to check on the tattoo). Everyone heals and retains the pigment differently. I will now answer the questions that I asked Michelle initially at my consult:
1) Q: How long does it last and do I need it touched up?
A: It should last between 2-3 years from the initial appointment. A touch up is recommended between 12-18 months after the initial procedure to keep the colour fresh as it will fade over time (it is a facial tattoo which is commonly exposed to the elements like sun and water).
2) Q: Will the tattoo fade to a blue colour like other tattoos do?
A: This one I was worried about- those older people you see with dark blue eyebrows who have had them ‘block’ tattooed black which have now faded to blue. No, the tattoo does not fade blue, as black pigment is not used to tattoo the brows with. Michelle said she uses the black pigment for eyeliner tattoos which can eventually fade to blue if not touched up regularly, but black pigment is not used to tattoo eyebrows so it will never fade to a blue colour. If left untouched, it will eventually fade to nothing over time.
3) Q: Pain level?
A: As explained before, the pain level varies person to person, but I did not find the procedure very painful at all.
4) Q: Will it look natural?
A: Yes. Maybe not in the first week as the colour will be strong, but it will fade and become natural looking. It is not a block tattoo; it is individual strokes aimed to look like natural hair. Even if you have minimal or no hair on your eyebrows, the strokes are designed to mimic hair. It will look more natural if you have more hair, but it will still look very natural if you have no hair. Feather touch tattooing is popular with patients that have lost their hair through chemotherapy and other illnesses such as trichotillomania which will not grow back. It is a more natural brow look than getting a block brow tattoo.
5) Q: Cost?
A: This is already answered on the website, but in case you were curious, is $550 for the initial treatment and $50 for the follow up appointment. Sounds expensive (and it is), but when you think about the hassle it will save you from doing your makeup every day, always looking like you’ve just been to the salon, money spent on brow products, and constantly feeling like a million bucks, for more than two years; for me it was worth it.
In conclusion…
I cannot really say I have had any bad experiences regarding this procedure so far. I am so excited to not have to do my brows every day when I wake up. I no longer look like a zombie when I leave the house without my brows ‘on’. Even my boyfriend noticed and complimented me and he never detects these things! I will still do my eyebrows on days when I wear makeup (most days I don’t as I do not have time- my makeup motto is all or nothing and it can take ages to do my full face). I no longer have to worry about my brows coming off during swimming or at the gym. I can look socially acceptable going shopping or meeting friends without have to do my makeup. I still can’t believe how good they look, and they aren’t even finished yet. I am so excited to go to my next appointment and get them finished, and then seeing the final product! Eyebrows really do change your entire face so it is important to get them right. If you are going to get this done, do your research. Do not be afraid to ask questions, research different companies that do feather touch tattooing, and read reviews. This is not something to take lightly and you definitely get what you pay for.
Thanks for reading, I know it was a long one! Feel free to ask me any questions in the comments below, and be sure to check out Michelle’s work if you live in the Western Australia area (I will put all the links below). I cannot recommend her enough. She is a friendly, funny and thorough person who is very good at what she does. She made my experience so comfortable and enjoyable. She also does pop up visits for all her cosmetic tattooing services in different areas and salons in WA, so be sure to check out her Instagram as well for details on that. I am looking forward to seeing the finished product that my eyebrows will become, and I will keep you updated on how they go.
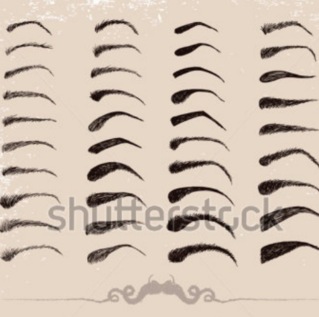
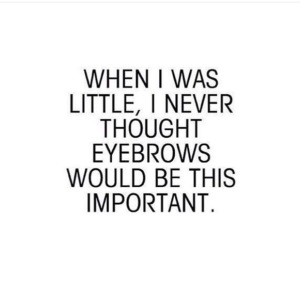
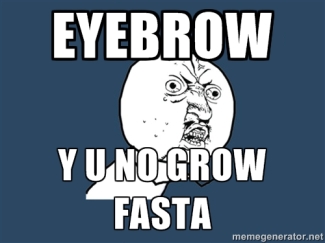
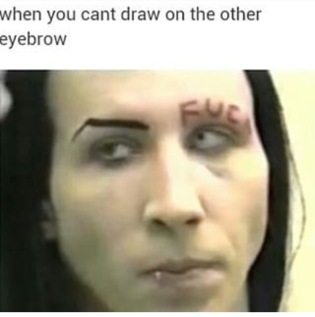
Continuing on from my previous post, all about my eyebrows, I have narrowed my list down to seven ways, tried and tested by myself, on ways to shape and tame your brows, especially if you do not have much hair! Please give them a go and don’t knock it until your try it. I know eyebrows can be a difficult and touchy subject, but they really do change and shape your whole face. It is important to make the most of what you can do with them. This post is a bit heavy, but I really like the humour behind eyebrow memes (I did not create these- I found them on Instagram under the hashtag #eyebrowmemes). Please do not be offended by any of the pictures!
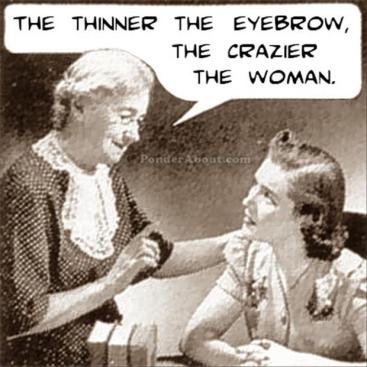
Truth
1) Try to grow them out first (Most important)
Pros: None for me- was a giant pain in the bum to be totally honest! But you should definitely try this before thinking about a more permanent solution like tattooing. My hair follicles around the eyebrow were destroyed from years of over plucking and my hair will probably never grow back in certain areas, but not everyone is like that. Give it a good three months (I know it’s hard) and don’t touch your brows. If you start to see promising results, I would keep going and just fill your brows in with makeup in the meantime, and remove the bottom hairs not near your natural eyebrow shape. You will save a lot of money (and tears).
Cons: Took a very long time (I’m talking years) and they never grew back fully and were thin/short/patchy. Not cool.
2) Filling them in with brow products everyday
Pros: I like applying makeup and this became part of my routine. I always felt super fly when I had my eyebrows on and got many compliments.
Cons: I don’t mind doing this for a night out but it was a hassle to do every day, especially when running late to work. The product took time to apply (around 10-15 minutes) and tended to melt off by the end of the day. Fine for going out but not for everyday activities. It got exhausting. And you could never get your face wet, which is annoying during the Aussie Summer as it is so hot and you spend a lot of time outside and in the water. I also went through brow products very fast (cha-ching $$$) and my favourite one to use I cannot find in stores anymore.
3) Tinting
Pros: I really liked tinting my eyebrows as it made them look really dark and more pronounced, but as I don’t have much hair they still didn’t look as I would like. If you have a lot of eyebrow hairs I would really recommend tinting.
Cons: Costly, depending where you go I would say the average is $20 a session, which should last between 1-2 weeks. The place I go to is more than that (eeek) but they are the only place I found that does it how I like. It also stains the skin around your (which is good if you have full eyebrows as it makes you look like you are wearing makeup when you aren’t, but if you are like me with not much hair makes your face look a bit muddy).
4) Waxing
Pros: Quick fix to overgrown eyebrows. Is over in about 5 minutes. Can be quite cheap (but you get what you pay for). Pulls hair from the root so should be at least a week before you see any hair return.
Cons: You have to go to a place that does it how YOU like. Do your research. Often waxing can remove too much hair. If you like thick brows I probably wouldn’t get a wax unless you trust the person not to take too much off. Can be painful as it is a sensitive area but the pain doesn’t last long as it’s over very quickly. May leave red marks around your eye area (so don’t do it on your lunch break).
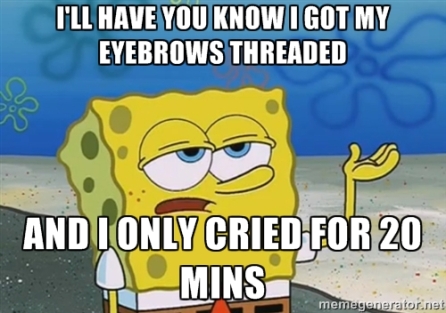
5) Threading
Pros: Very precise. The threading artist removes several hairs in a row with string (a bit hard to explain, click here for a demo). It is nearly impossible to remove too much hair with threading. It is softer on the skin too so not as much redness (ie. could be done on your lunch break). Shape is nearly perfect if you explain what you want beforehand. I prefer threading to waxing.
Cons: Can be a bit painful if you aren’t used to it. Does take longer than waxing (around 10-15minutes). Threading apparently also pulls hair from the root so it should last at least a week, but I always found that when I had my brows threaded they grew back quicker than if I were to wax them.
6) Plucking (Using tweezers)
Pros: Is cheap (free) and you can do it yourself to the shape that you know suits your face. You can do it whenever you like instead of waiting for enough regrowth to pay someone to do it.
Cons: Temptation to over pluck can be a huge problem for some people (trust me) and the results for that can be disastrous (and permanent).
7) Eyebrow extensions
Pros: Technician applies individual hairs to your eyebrows into fill them in and it makes your eyebrows look really natural and full.
Cons: It t was time consuming (at least an hour to apply), expensive (I tried it for free when they had a free trial at my local salon, but I think the normal price is at least $75 and higher), and they didn’t last long (they are meant to last around 2 weeks, but they fall off naturally and my eyebrows were basically back to normal within the week).
These are the things I have tried. Now I will briefly discuss how I draw my eyebrows on using makeup. I love full brows with an arch and a sharp tail. Here are some photos of how I draw my brows. Please keep in mind this is how I like them and you may not like this- everyone’s opinion and face is different, and you should practice drawing them how you like.
For day to day brows I use a softer brown colour and at night or when wanted them more defined I draw them darker. It took me a long time to get my brow shape right and I always struggled making them symmetrical. Naturally, one of my brows has a higher arch than the other (annoying), and one brow has more hair, making it easier to fill in. I wish I could make a pictorial for you guys, but I am hopeless (maybe one day). I hope you can sort of understand it through me describing it. I’ve tried most of the brow products out there, and I’ve found my Holy Grail brow products:
1) For a softer, everyday look I like to use Melanie Marris Brow Gel in Brown or the Anastasia Beverly Hills Brow Pomade in Medium Brown with an angled brush. Using a spoolie, I brush the hairs into place, and I dip some product on an angled brush, wipe off the excess and fill in my brows that way. It lasts longer than powder as it is water resistant and perfect for those days when you need your makeup to last a bit longer. You can also make the colour as strong as you like, so I like to us only a small amount for a softer look.
2) For a bolder look I use a combination of Prestige Brow Definer in Toffee (which is like a crayon-like type of pencil- it is the best thing I have ever used on my eyebrows and I can no longer find it in stores) and Zubias Brow Powder in Dark Brown. I outline my brows with my brow definer to get the shape I want, and fill them in with the brow powder and angled brush. I sometimes use concealer on a small brush to clean up and make them crisp. I use these products on a day when I feel like having a full face of makeup as it is darker and I can create a sharper look.
Basically
I have watched zillions of brow tutorials on YouTube and tried almost as many eyebrow products. I will continue to do my brows this way unless I find a better product or way of doing them! I would love to hear how you guys do your brows.
If I were to recommend a way to do your eyebrows, I would suggest getting them threaded or waxed and tinted every second month to have the shape decided for you, then just pluck the stray hairs in between. Fill them in with brow products that you like as part of your makeup routine. That’s learnt to do, but it is not always that simple. It took me nearly 10 years to make up the damage from destroying my eyebrows due to over plucking, and for some parts it was too late. If you are a young person reading this, please, I beg you, do not touch your own eyebrows until you know how to handle it. Get a professional to look at them first, and they can decide what’s best for your eyebrows. You may regret not doing so in the future. I certainly did. For my next blog post, on my feather touch tattooing experience click here. I would love to read in the comments any other ways you know of doing your brows or brow problem solutions.
I wanted to write about something a bit different than my usual nail polish related posts on the blog today, so you can skip this one if you aren’t interested. I am also into makeup as well as nails and would like to start writing posts about that too, so here’s the first one!
I recently got my eyebrows TATTOOED (I know, sounds painful and very permanent) and I really wanted to write about the experience I had. Before that though, I thought it would make more sense for you to know about my eyebrow history. If that you don’t really care about that (and I wouldn’t be surprised if you didn’t!), but you want to know about my tattooing experience, I will split this into three parts- this post, specifically on my eyebrow history and what I normally do to keep them looking spiffy, the next one on ways to tame your eyebrows (that I have tried and tested) and another on my experience with feather touch tattooing. If that interests you, please keep reading, or skip to end to see the links for the other two parts to my eyebrow story.
I didn’t always have terrible eyebrows. My eyebrows were once untouched and full, didn’t have gaps and although they were light, they were still there. Not being allowed to touch my brows until high school thanks to my Mum’s infinite wisdom, I remember one day as soon as I was left alone with a pair of tweezers, going to town on my brows until they were left looking like tiny half eaten caterpillars. Thin brows were in then and they didn’t look too terrible (or so my 12 year old self thought).
Fast forward a few years, when I started coming into my ‘mature’ adult body and worrying more about my appearance, I started to panic when I realised my brows were not coming back. I didn’t realised the damage I had done to my brows from to all that over plucking. They were thin, sparse, had gaps and were very light. I went through many stages of trying to let them grow back, only to pluck them again. I developed trichotillomania (a condition which causes some people to have strong urges to get pull the hair on their body out- in my case, my already damaged eyebrows and my eyelashes) due to some stressful events in school which continued into my university years. It took a few years to get out of that habit, and by that point it was far too late. My eyebrows were damaged beyond repair. They were thin, sparse and very short- only about 1.5cm long (I had no tails on my eyebrow- just the middle bit). People constantly asked me ‘What happened? Why would you do that to yourself?’ I was horrified.
I got into makeup when I was in university and would fill my brows in everyday with pencil. Over the last year, sick of being embarrassed to go anywhere without my brows ‘on’ (as I would describe it), I made a strong effort to let my eyebrows grow out as much as I could by not waxing, tweezing or threading them. I would fill them in with pencil most days when I went out so they didn’t look as scraggly (they still did but not as bad when most of it was coloured in). I occasionally plucked at the lowest point of my brows where I knew I could get away with plucking (it got to a point where I could barely leave the house they were that bad, I was so embarrassed). Once they had thickened out a bit (the ends still didn’t grow) and I couldn’t stand growing them anymore, I went to an eyebrow stylist in Perth who waxed and tinted them. I finally had some definition to my eyebrows! There was only so much they could do for the shape though as my eyebrows were so short, and still quite thin. The tint faded after about a week, and my eyebrows went back to being faint, half brows, which I still had to draw on every day. I got my brows waxed and tinted once a month. The place I went to was great, and I did like how they did my brows, but they were a bit pricey for me on my salary. I began to look for a more permanent solution for my brows. I tried nearly every way I could find to fix my eyebrows before deciding on feather touch tattooing- I suggest you try these things yourself if you are looking for a solution to fix your brows. Click here to see Part 2 of my eyebrow story- my list of ways to shape and tame your eyebrows! Or click here to skip to Part 3 of my eyebrow story- my feather touch tattooing experience.
Thanks for reading! Feel free to leave any comments or questions below. And please check out my next two blog posts for more of my eyebrow story.


 5) Threading